|
|
Low Budget 350 Chev - Page 3
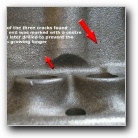
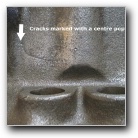
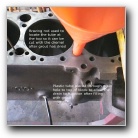
GROUTING THE BLOCK Set one side of the engine block level in your engine stand so the finished top of the grout levels evenly around all of the cylinders. I had to drill an extra pin hole in my engine stand to achieve this. Use a clamp to hold the stand firm and not allow it to rotate while drilling. As you can see in the pictures, I have added a small piece of air brake tubing in through the block drain hole and fed it up to one of the top water port holes. I used a brazing rod to hold it in place while the grout cured and also to block the end off to prevent grout from filling it. The idea of the tube is after the grout has cured I can use the dremel to cut it down to the surface of the grout and also grind it back enough through the bottom drain hole. Once finished a block drain tap can be put back in and I can still drain the coolant as required. Mix the grout with the least amount of water needed to allow it to flow easily. The less water the less chance of shrinkage of the grout. Most prepackaged grouts seem to have plasicisers in them so they remain "fatty" which also helps them to flow a bit easier. Determine how far up you want to fill the block, mine was filled to the bottom of the water pump inlet port at the front of the engine. Even though I do not use a water pump in the T-Bucket, if at some stage I need to add one it will be still possible. I have heard some engine builders fill to the bottom of the front welsh plug hole. Make sure you work out what you want because it would be impossible to get the grout out once it has cured. Pour the grout into the water jacket area from the top using a small funnel. Start from the rear of the engine block and use a rod to push it through the funnel and into the engine block. One thing to remember before starting is to have a good torch ready to inspect the levels through the head bolt holes. I used a small single LED (light emitting diode) torch as it was small enough to point down one bolt hole and see the resultant level through the next. Using a large torch was almost impossible to see anything due to reflections. Work your way to the front of the engine with the grout making sure to use the rod to get it in between the cylinders until you get to the front and it fills to the level you want. You can also use a small rubber/plastic hammer on the sides of the engine block to help settle and level the grout. DO NOT use a normal hammer as you may end up with more cracks than I have. Clean up your spills and make sure the brazing rod is still holding the plastic tubing if you used it and leave the grout to cure. I will turn mine to the other side next weekend, then leave it a few weeks if you have the time for a full cure before it goes in for boring. 12-October. I swapped over to the other bank and poured it with grout as well. I also cleaned all the head bolt threds out as there was some grout stuck in them as well. During the week I placed an order for a cast crank for the engine. It should be here by late next week and I will continue on the next page. Selecting the crankshaft...
|
|
Last Update:
|
|||||||
|
|
|||||||||
|
|
|
||||||||