|
|
Low Budget 350 Chev - Page 1
Introduction (Project commenced October 2003) This would have to be one of the lowest budget buildups that will end up in an modified altered T-Bucket and hopefully will run reasonable numbers for a season or two if I am lucky. It will be assembled using parts sourced from swap meets, leftovers from days gone bye and bits salvaged from the scrap heap. Professional engine builders need not read any further unless you want to find out how NOT to build an engine. The plan is to get enough horsepower out of it to drop my et's enough to run in the 9 second range without busting the wallet, and if lucky, without even opening the wallet :) (NOTE: The engine is now in the altered and has run 9.6s on it's first outing and the second meet it ran 9.4s! - April 2003) One thing to remember I am a Plumber by trade and not a mechanic or engine builder. I do intend to build the engine with no assistance other than with the machinist work. At the very least you may have a laugh reading this site, better still some exercise shaking your head in disgust.. As I obtain parts and assemble the engine I will add to this page including some pics as I go. The Block I obtained a 350 Chev two bolt block (010) that had a crack in the water jacket in the valley area just above the lifter bores. The price was good (free) as it was ready for the scrap heap. It had been sitting for some time and had rusted around the timing cover area. I took it into the local machinist shop and asked the easiest way to see how bad the crack was as it was almost invisible. He applied an electromagnet to the area and dusted the valley with a red powder and then some rusty liquid while I waited. The "crack" turned out to be 3 cracks and appeared as though they were from a cooling (or overheating) problem. Most likely from a cold area and the coolant had probably frozen. The first option was the bin, second would be to use a lock & stitch system which, due to the length of the cracks would cost more than a reconditioned block. We marked the ends of the cracks with a centre pop so I could later drill a small hole to prevent the crack from spreading. My idea was to grout fill the block to the bottom of the water pump entry ports at the front of the block, thus preventing coolant getting down to the cracks. As I use alcohol fuel in the current engine (307 Chev) and have trouble keeping enough heat in the engine between rounds I don't think overheating will be a problem. The grout filling may help give the block some additional structural support as well. I dropped the block to a local engine builder to get checked what oversize it would need to be bored to. It measured up at .020 and he said the condition was probably good enough to hone and drop in new .020 pistons. Since either way I needed new pistons I opted to bore it to .030 and proceeded to search the trusty net for piston info and specs. I also searched for info on grouts and expansion rates etc. and found the grout used under steel columns to be high strength and non shrinking. Just what I needed.. I contacted the local building supply shop and inquired about the grout. The stuff found on the net was not available out of the warehouse here in AU but the distributor suggested another product that had similar qualities and to my surprise sent a 20kg sample bag for me to try for free. That something you don't come across too often these days so I will mention the product is Ormonoid DuraGrout manufactured by Davco a tiling glue and grout company here in Australia. Another plug for them is that I used their rubber based tile glues and their tile grouts when renovating our home and am quite happy with them. Time to order pistons...
|
|
Last Update:
|
|||||||
|
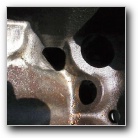
Photo of the block after crack testing. The red oxide is used to detect the crack when a magnetic field is applied to the casting. Now it is off to the acid bath.
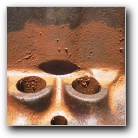
A close-up of the cracks. The iron filings in the liquid allow the cracks to be seen easily.
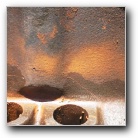
Another view of one of the cracks. This is what can happen to an engine block when subjected to freezing conditions without antifreeze in the coolant.
|
|||||||||
|
|
|
||||||||