|
|
Low Budget 350 Chev - Page 6
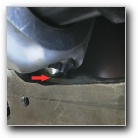
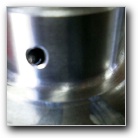
The first thing I had to do was thoroughly clean the block. It was already acid bathed (hot tanked) prior to the grout filling so basically all that was needed was a good scrub to clean out any loose grout, spray oil or other foreign matter. This wasn't the first nor would it be the last of the many cleanings the block will get before I finally assemble it. I don't believe you can over clean your engine block. A good clean through the oil galleries will be needed a few times as I go along and the best thing I have found to use is my gun cleaning rods and a brass (not stainless) brush that is used to clean the barrel of a .357 magnum. Once cleaned and dried I used an old set of engine bearings to lay the crankshaft into the block so I could bolt one of the conrods into each location. (No piston attached as at this stage the rebore has not yet been done) Effectively all this did was give me an idea if and where the rods may come into contact with the block. In this case because of the use of alloy rods, the pan rail, just above it closer to the bottom of the bore and the bottom of the bore near the camshaft needed grinding. In most cases where steel conrods are used, grinding may not even be required although from pictures I have seen of some of the H beam conrods I would make sure your clearance is OK at this stage. Each area where contact may occur I used a rotary air grinder to remove the minimum needed to obtain clearance. Now to wash the block again to remove all the grinding material so the crank can be once again laid in position and one rod used to check clearance on each cylinder. ( I did not install main caps nor did I torque the rod bolts yet.) The gudgeon pin end of the rod was taped to prevent bumping the bores and as the crank is rotated the gudgeon end of the rod is held approximately centre of the bore with a spare hand. This does not need to be extremely accurate at this stage. I carried out this procedure three times until I was happy I was close to having clearance on each area contact may occur. Doing this before the rebore reduces the chances of the grinder stuffing up a newly honed bore. The next step is to remove any casting flash or rough casting around the oil drainback holes in the rear of the valley and any other areas that look rough. I usually check around the sand casting parting seams and clean them up as well to reduce the chances of cracks starting. The machinist who was to carry out the boring for me advised if I wanted the block torque plate bored and honed that I would need to install the main bearing caps using the intended studs/bolts and torque them to specs to save him some time on arrival. Another piece of advice if you are intending to torque plate your block when boring is to take your head bolts or studs and decide what head gasket you intend using to assemble your engine. The machinist would use the same type of gasket I will be using between the block and torque plate to simulate as best as possible what stresses that would be placed on the engine when finally assembled. After seeing the machine work being carried out and the accuracy involved I would thoroughly recommend paying the extra to have torque plates used on a rebore. Next... Boring the Block
|
|
Last Update:
|
|||||||
|
|
|||||||||
|
|
|
||||||||